We offer a wide variety of dental instruments, tools, and supplies. We promise that every item leaving our facility has undergone the most extensive scrutiny and quality control in the industry.
Ordering is easy through our online catalog. If you don’t see what you’re looking for, have questions about a product, or need assistance or recommendations, please contact us and we’ll be happy to assist you.
Our toll-free number 1.800.222.1851 connects you directly to our knowledgeable customer service staff in Charleston, SC. You don’t have to wait through frustrating prompts to get the information you need. Our customers are at the heart of all we do. We pledge to provide only the highest-quality dental products with unequaled customer service.
Quality, value, and service. There’s no substitute for ordering your dental office supplies directly from Diatech.
Meet the women who run Diatech: Karolyn, Patti, Alicia and Cheri.
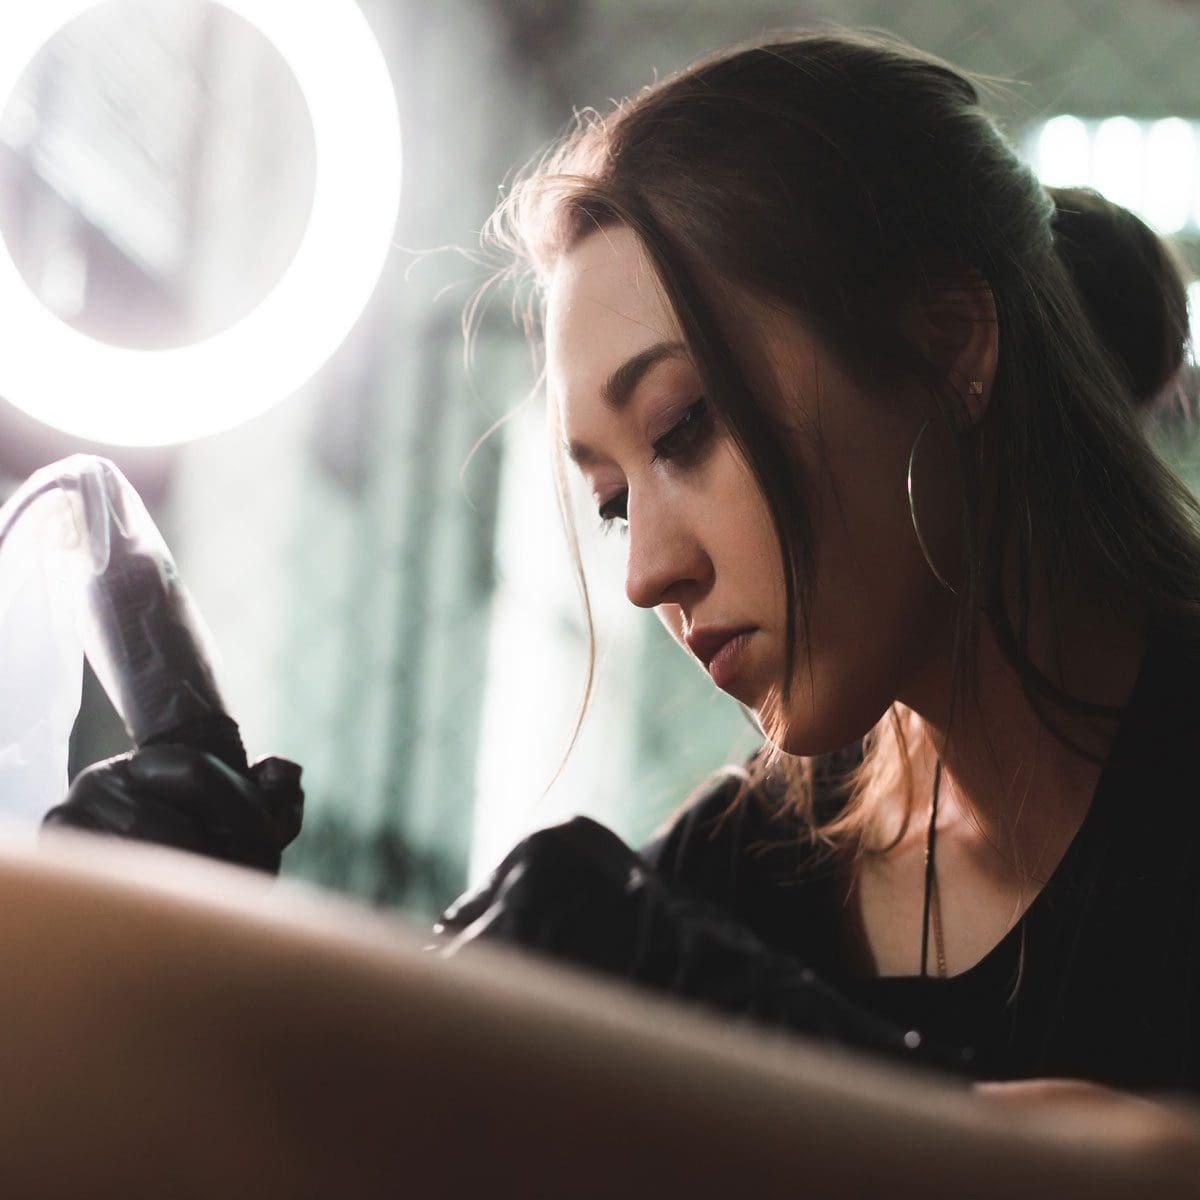
You are artists, and your canvas is the human body. There’s something intensely unique about creating the permanent design that your customers will wear.
There are also stringent regulations to follow, and many of these focus on sterilization.
Diatech offers a variety of autoclave, ultrasonic and dry heat sterilizer equipment for tattoo artists, ensuring that your workspace and needles are safe for the next customer. We’ll also help you stay within all your state’s sterilization regulations.
Sterilizing Equipment, Solutions & Supplies for the Tattoo Industry
One of the benefits of getting sterilizers, solutions and supplies from Diatech is that our team will make sure you meet even the most stringent requirements. Have a question? Ask our experts about which sterilization setup will work for your shop or browse the products below.
Maintaining Sterilization Equipment in a Tattoo Shop
If you don’t take care of your machine and follow the recommended maintenance, it may not provide the level of sterilization you need to stay in compliance.
All of our sterilizers come with detailed manufacturer’s instructions that are easy to follow.
Your state health department may require you to have regular quality check testing to ensure the unit is working properly. We stock tests for spore strips, cleaning monitors and indicator strips to ensure your equipment is sterile and reaching the right temperature over time.
Tattoo Art: A Profession that Requires Attention to Detail and Cleanliness
Attention to detail is all-consuming when you’re a tattoo artist. Every line and color must be perfect. Likewise, avoiding cross contamination requires detail that is vital for your safety and the safety of your clients.
Remember that bloodborne viruses can live on objects for almost a week, and it’s easy for germs and viruses to spread if your tattoo equipment is not maintained or surfaces are not disinfected.
Cross contamination can occur when:
Tools are placed on a counter that has not been disinfected
Tools are not sterilized between clients
Someone touches another object without removing gloves
The disinfectant isn’t left on the surface long enough to kill the germs
There’s a difference between clean and sterile. Cleaning refers to removing visible contaminants. Disinfecting is another step, which kills microorganisms except resistant bacterial spores.
Sterilization is the most thorough; it eliminates all microbial life. This is the most important aspect of keeping your tattoo shop safe and within state and federal regulations.
When your burs aren’t getting the job done, you’re losing money.
Period.
Inefficiency costs dental offices thousands of dollars, and if your burs aren’t getting the job done in a timely, efficient manner, your profit is taking a hit.
But what if you could do four days’ worth of dentistry in three days?
It’s possible, but only if you have the right tools.
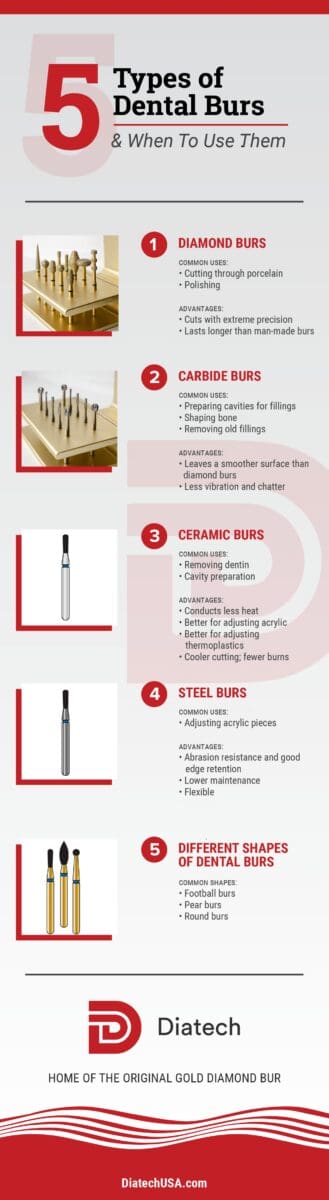
Today’s dentists might consider it an embarrassment of riches—now, more than ever, dental professionals have an extensive array of burs and shapes available that enable them to treat a wide variety of surfaces.
Whether you’re removing an old filling or preparing a tooth for a crown, there are a myriad of choices available to you. So how do you know when your burs are satisfactory and when you need to look for a replacement?
Signs Your Burs Aren’t Making the Cut
Better burs mean a better bottom line. Some signs that your current burs need replacement or need to be revisited include:
Routine dental hygiene tasks take longer
Instruments don’t stay sharp, even after moderate use
You’ve noticed patient complaints either in the office or on popular review sites
Appointments take longer (which means you’re seeing fewer patients)
Your instruments burnish the surface of calculus, which in turn opens the door for microbes
Difficulty removing calculus deposits
Okay, so now you know that your burs may not be all they’re cracked up to be…but what next?
There are still multiple choices about what kind of burs you should use to replace them. We’ll review some basic principles of what you should expect from your burs, how to determine the type of burs that are most efficient for your practice and how Diatech has you covered.
Multi-Use vs Single-Use Diamond Burs: Which Should You Use?
Is it worth a slightly larger investment to use a multi-use dental diamond bur? Or maybe eliminating the headache of sterilization with single-use burs would more closely align with your practice’s goals.
There is never a “one size fits all” for your practice. That’s why you should carefully evaluate the benefits and drawbacks of using single use vs. multi-use dental diamond burs in order to discover which one is right for your team.
Thankfully, with Diatech, you don’t have to choose. Our quality dental diamond burs are strong enough to last for several uses but are economical enough that you can opt to implement them as a single-use tool.
We’ll take a look at the pros and cons of single use vs. multi-use dental diamond burs, how to clean dental diamond burs, and how to decide which is right for your practice.
Three Reasons to Use Disposable Diamond Burs
Deciding to embrace the single-use model creates three main advantages: saving time, preventing infection and improving precision.
First, disposable dental diamond burs save time because you don’t have to sterilize them. Because these items are single use—and should never be processed—they should always be disposed of after one use.
They aren’t heat tolerant. There’s no way to properly or reliably disinfect single-use items. Disposing the items means you save time that would otherwise be spent sterilizing them.
Second, because they are disposed of after each use, this helps prevent infection by eliminating the chance of cross contamination between patients.
Third, they can improve your precision because every time you have a new, diamond dental bur on hand it is perfectly sharp because it has never been used.
Are Dental Burs Reusable? Reasons to Use Multiple-Use Dental Diamond Burs
Yes, dental burs are reusable, and for some practices, the multi-use option is more appropriate. It also presents advantages such as better economic investment and higher quality.
First, reusing the items can be very cost-effective, especially if the cost of disposable burs rises. You’ll have to take a look at your practice and evaluate this economic ratio to fit your individual situation.
Most dentists find that they can reuse a Diatech dental diamond bur around five times without sacrificing quality.
Of course, effective usage depends upon proper sterilization.
Many practices make the mistake of not biologically testing their sterilizer or making other sterilization errors.
Second, because these burs can last through several procedures, they are of much higher quality than what is seen in single-use only dental burs.
How to Clean Dental Diamond Burs
The process of cleaning and sterilizing dental diamond burs depends heavily upon the type of sterilization you’re using. This is weighed against the sterilization temperature.
By evaluating these two factors, you’ll be able to devise a “formula” that will enable you to thoroughly clean and disinfect your dental diamond burs.
The most common types of sterilization are unsaturated chemical vapor sterilizers, steam sterilizers and dry heat sterilizers.
How Long Does It Take to Sterilize Burs and Other Small Dental Instruments?
Again, this depends upon the type of sterilizer and the temperature. The time will vary depending upon the individual manufacturer’s recommendations, but in general, time can range from 20 to 40 minutes for unsaturated chemical vapor sterilizers.
Steam sterilizers may require up to 30 minutes, while dry heat sterilization can complete a cycle in six to 12 minutes. Oven-type dry heat sterilization can need 60 to 120 minutes.
Before you begin sterilization procedures, you want to be sure you’re efficiently monitoring your sterilization equipment to ensure you’re meeting all CDC guidelines.
Diatech: The Right Choice for Dental Diamond Burs
With Diatech, you don’t have to decide between single-use or multi-use. Our diamond burs are of high quality and are designed to be used multiple times. However, they are also economically priced, so you also have the option of using them as single-use burs as well.
The Best Carbide Burs for Working with Acrylic & Composites
When considering the best type of carbide bur for working with dental acrylic and dental composites, you should consider aspects such as shape, size and blade design. All these elements work together to streamline the process, producing the best results possible for patients and your practice.
Understanding Your Burs
When examining your burs, you already know that diamond burs are a good choice for grinding away at the enamel but remember that they will leave a rough surface.
Carbide burs leave a smoother surface. Created from tungsten carbide, they are around three times stiffer than steel, which makes them the perfect choice to remove large pieces, especially if preparing an area for a filling. Carbides are also a good choice for removing an old filling and for shaping bone.
Be sure that smaller burs are used in narrow areas to avoid touching surrounding areas.
Larger burs are better for creating smooth surfaces and reducing the amount of acrylic material.
Typically, flutes that are deep and wide may be more commonly used to prepare cavities.
Shapes to Consider When Working with Dental Composite and Acrylic
Not sure what type of carbide bur would be best in your situation? Don’t worry, we’ve outlined some of the most common functions for each shape.
According to Inside Dental Assisting Magazine, the most popular shapes for carbides are tapered and round because they have the most flexibility and can be used on a wide variety of surfaces. We’ll take a look at the different types of carbide bur shapes and what to consider when purchasing one.
Some of the more common bur shapes and cuts that are most frequently used with dental composite include:
Cross-cut
These can streamline the cutting process. They can section multi-rooted teeth and are also needed if you want to reduce the height of a crown. They cut quickly but often they can cause more vibration.
Straight-bladed
A good choice, they may cut slower but are often smoother.
These burs are a good choice for creating undercuts as well as access points. They’re also perfect for cavity preparation.
Pear
This can be another option if you need to create an access point. Like the round shape, they are also used for cavity preparation. For smaller teeth, the pear shape can be useful for splitting roots.
What Makes Our Carbide Burs Different
Our proprietary technology allows us to produce these burs from a single piece. As a result, they provide less vibration, less chatter and have precision concentricity.
Not only do they have less likelihood of rusting, but they have reduced prep time. Our advanced quality control process ensures precision carbide burs and their clinical performance for your complete satisfaction.
When working with acrylic, consider some of our quality products such as:
We offer quality, reliability, and the kind of superior customer service that you should expect when ordering a Diatech product. We have an expanded product range, and when you need assistance, you’ll get a customer service representative—not a recording or a frustrating “phone tree.”
The Best Finishing Burs for Your Practice
You’re facing two very challenging tasks.
First is the restoration of your patients’ teeth. This may mean making a crown or simply filling a cavity.
The second challenge is the effort to make the tooth look natural, providing a smooth contour and refined polish.
Properly finishing a tooth is where advanced dental science mixes with crafted artistry to create a surface that is as close to the original tooth as possible.
This is why fine grit burs and finishing carbides are some of the most instrumental parts of your bur set. It’s vital that no excess material goes beyond the cavity or overhangs.
It also has to properly align with other teeth. Properly finishing teeth also means that there is less risk of staining, and it helps keep plaque from gathering on the surface of your restorations.
Getting a stellar result means using the right tools, and we want to review with you some vital finishing bur bits to have in your bur set.
What type of finishing bur or bits should you use?
Following are some things you should keep in mind when deciding what type of finishing dental diamond bur set to purchase for your practice.
According to the book Aesthetic Dentistry, comfort is the main factor in selecting a bur. This means a better experience for your patient and yourself. As we discussed in an earlier blog post, patient satisfaction creates a more pleasant work environment for all who are involved.
Dental Bits & Burs to Avoid
You should not use non-flexible strips and abrasive discs because they can flatten the tooth’s contours. These anatomical contours are essential in creating the natural look your patient needs. You should also avoid coarser diamond burs as well as carbides with more than 12 flutes. These bur bits can cause damage to the outer restoration layer.
Use the Most Appropriate Bur Shapes
Good burs to use are a proximal bur and conical burs.
Needle-shaped, fluted tungsten carbide burs are a good choice, as long as they are 8 to 12 fluted. These help recreate the peaks and valleys that are seen in natural teeth. Pointed burs can also help when you’re attempting to finish areas that are located in the margins. It’s important to always use lighter pressure and a large amount of coolant.
What should you look for in a good finishing bur?
Dental bur assortment sets don’t always get the attention they deserve. After all, there are several more high-dollar items in use for your dental practice, and these bits may seem minor when compared to the investment in materials such as digital X-rays, sterilization equipment and even dental chairs.
But an efficient finishing bur is a benefit to both your practice and the bottom line.
Don’t fall for the “false economy” of burs that are inexpensive but don’t last long.
Look for carbide burs that have less vibration and “chatter” in order to help you shape bone. Some of the less coarse diamond burs could be a good choice, particularly for extreme precision and polishing.
Several Important Factors of Selecting a Dental Bur Set
There is a dizzying array of various dental bur sets you can select, so how can you tell which is the right one for you? We’ve outlined a few important points you should consider.
First, examine the primary focus of your practice. Do you concentrate more on orthodontics or does your office specialize in endodontics? You should gear your tools to the procedures you perform the most.
For an example, crosscut burs will cut faster, while those used for preparing teeth for a restoration or filling will cut wider and deeper.
Second, examine the shape you need. It’s important to focus on the shapes you use most—each shape can be used for certain procedures, and the cut of the bur can often influence how much the handpiece vibrates. This can make a big difference in precision.
Third, look at the type of material that will work best. As we’ve discussed in this article, coarse diamonds may not be the best choice for finishing, but some of the smoother varieties of diamonds may be effective, especially for polishing. For more information, check out this useful article that will help you determine if diamond or carbide burs will be the best choice for you.
Interested in learning more? Take a look at some of our other useful articles:
Diamond or Carbide Burs? These Questions Will Help You Decide
For decades, we’ve produced the best diamond and carbide burs that are both versatile and long-lasting. But when should you use a diamond vs. a carbide bur? We’ve gathered some useful questions to help you decide which might be appropriate.
The Differences Between Diamond and Carbide Burs and When You Should Use Them
When considering what type of bur to use, ask yourself:
What type of procedure are you doing?
The right tool is needed for the right job, so this should be the first question you ask when considering diamond vs. carbide. For example, a carbide bur would be a better choice if you were preparing a tooth for a filling.
What type of material will I be cutting?
If you’re cutting a hard material such bone or metal, then a carbide bur would be a good choice. They can be easily used on gold, silver and bone. They’re also an excellent choice for removing old fillings. Diamonds would be a better choice for cutting porcelain.
How much material will I be removing?
Diamond burs are more appropriate for detail work instead of removing large pieces of material. For these jobs, carbide would be the best choice.
What is the level of precision required?
Granted, all procedures require absolute accuracy. However, sometimes you have a situation where you have to be even more diligent about the details. For cases such as this, you may want a diamond bur. They are smoother than carbides and will provide the precision you need. In addition, diamond burs tend to last longer than carbides
Diatech Diamond Burs Have Been the Leaders in the Industry
At Diatech, good is simply not good enough. Extensive craftsmanship and stringent quality control go into every piece that leaves our facility. We’ve also cut out the middleman so you can order direct—which saves time and money. Contact us for more information.
See What Makes Diatech Stand Out From Our Competitors
We use only the highest quality materials, including Swiss-engineered gold diamonds. All of our products offer the best in longevity, value, performance and durability. We understand the importance of efficiency to reduce fatigue.
We want you to experience the ease of our online ordering and how eliminating the middleman takes a lot of headache—and expense—out of the process. Isn’t it time you experienced Diatech quality? Contact us for information on our latest specials.
This single, dual-organism strip test comes with a control strip. Pay for postage and only receive a report when your test returns a positive growth result. These come in packages of either 12 tests or 52 tests.
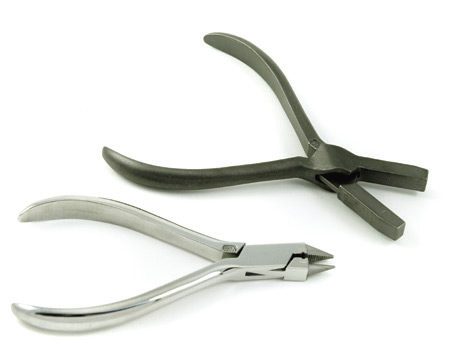
The use of tungsten carbide in orthodontic pliers is on the rise. With the increasing use of steam as a preferred sterilizing medium, the old high-speed tool steel tips are becoming less and less popular due to its poor tolerance to water.
Tungsten carbide does not rust when autoclaved because it contains no iron, although it can still be damaged. Acids, in particular, can cause dissolution of the cobalt matrix and literally melt the tungsten carbide tips away.
Is tungsten carbide stronger than steel?
Tool steel has been used since the late 1960s for making the jaws of pliers tougher and more wear-resistant. For decades, its popularity has been due to its properties such as:
Ductility (the physical property of a material associated with the ability to be hammered thin or stretched into wire without breaking.)
Hardness
Wear-resistance
Superior grip
Excellent machinability
These properties have made tool steel the perfect material for making high-end orthodontic pliers. Its only drawback was its poor tolerance to water.
In spite of being tough to machine, brittle, and slippery when trying to bend or grip a wire, tungsten carbide has filled in the corrosion gap because it is non-ferrous and won’t rust in the presence of aqueous processes like autoclaving.
In the plier manufacturing world, Diatech has had experience with various forms of carbide since the 1960s. Tungsten carbide originally showed up as a tip material in our German-made #150 ligature cutters. It then became widely used in Mathieu needle holders and Weingart pliers.
Are tungsten carbide pliers more corrosion resistant than steel?
Tungsten carbide is an ultra-hard chemical compound made from equal atoms of tungsten and carbon and held together (cemented) by another material. Most often the material that sticks it all together is cobalt, but applications that require enhanced corrosion resistance use nickel as a binder.
Because of the fact that there is no iron in tungsten carbide, it absolutely won’t rust (see our article on Caring for Hinged Instruments for more information on removing rust from pliers). That does not mean, however, that carbide is impervious to corrosion. Acids, in particular, can cause a dissolution of the cobalt matrix.
noticed severely compromised carbide tips when orthodontists switched from alcohol wipes to real disinfectants.
This process – called leaching –can leave the piece of tungsten carbide “swiss-cheesed”; basically the hard grains hanging with no support. In the early 1980’s, with the shift in orthodontics from alcohol wipes to real disinfectants, dentronix started to notice severely compromised carbide tips in the Mathieu pliers it received in the repair department.
The cause was eventually traced to an acidic glutaraldehyde product that was literally melting the tips away. This can also happen with acidic cleaning solutions.
Hydrogen Peroxide Plasma & Tungsten Carbide
Most recently, we received photographs from an Asian dental clinic that was sterilizing carbide-tipped distal end cutters in a hydrogen peroxide plasma system. The tips of these pliers had turned deep black after only a few cycles.
Research indicates that hydrogen peroxide is to carbide what Kryptonite is to Superman. As a strong oxidizer, it literally dissolves the tungsten carbide portion of the insert and destroys the plier tip.
The bottom line is that each material used in instrument manufacturing has its plusses and minuses; its friends and its foes. If your process of cleaning and sterilization is working well, don’t change anything without doing your homework first. Switching your processing chemistry to something “better” or “cheaper” can have dire consequences to your significant investment in instruments. Call the folks that make your instruments – or call one of our tool specialists in Charleston, South Carolina – and ask about causes and effects of different sterilization methods. We can save you time and money in the long run.
How do I know what material my pliers are made from?
If you purchase orthodontic pliers, hemostats or cutters from Diatech / dentronix, then the following guide will help you decide which sterilization method to use with your instruments.
Superior Craftsmanship, Affordable and Ergonomic
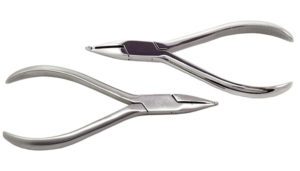
Shop the best in orthodontic pliers. With sharp and smooth operating ortho pliers, difficult work can become easier. We’ve selected these name-brand orthodontic plier manufacturers for their superior craftsmanship, affordability, and ergonomic designs.
Pliers manufactured with box-jointed plier blanks, compared to the scissors-style lap joint, offer tremendous advantages in increased bearing surfaces and contact areas for maintaining tip alignment.
A highly polished surface provides the best resistance to corrosion, staining, and discoloration. We believe that a premium orthodontic plier should have a high gloss finish.
Learn the differences between ProDent vs PlyDentCo vs Dentronix orthodontic pliers with our product comparison table.
Materials
Tungsten Carbide Inserts & German Steel
Inserted with Siberian Stone™ Technology
Royal: Super-hard stainless tool steel or Tungsten Carbide tip inserts Classic: Vanadium Cobalt tool steel inserts
At Diatech, we manufacture superior and innovative products for the dental industry… for the dentist, dental hygienist, dental assistant, orthodontist, endodontist and lab technician. We stand behind our promise of uncompromised quality and the best in competitive pricing.
Accurate Results Require Understanding the Process.
There are lots of ways to make sure your sterilizer is working properly. Some sterilizers, like our DDS 7000, have sophisticated software that won’t let the unit move to the next phase unless specific parameters have been met. If time and temperature milestones are not achieved, you will not get a “cycle complete” indication.
What is biological indicator testing?
This type of testing indicates certain parameters have been met to ensure the unit is properly sterilized. Some sterilizers can be hooked up to a serial printer which records each cycle.
In addition, chemically coated paper strips can be used for testing. These change color to indicate whether or not you have achieved the desired results. These are called “process indicators” and are often included in each sterilized load.
What are the CDC guidelines for biological monitoring and office sterilization procedures?
The CDC guidelines for dentists and orthodontists recommend that your sterilizer is biologically monitored once a week. To meet the CDC requirements, you must demonstrate that all live organisms have been killed.
What about biological monitoring for dry heat sterilization?
You don’t start killing bugs until the instruments –not just the chamber—are at the target temperature. These temperatures can vary from 160°C to 190°C (320°F to 375°F).
There is a different mechanism for killing pathogens for dry heat sterilization as opposed to a steam autoclave or an unsaturated chemical vapor device (chemiclave). The latter processes are exposure-driven with efficacy based on conditions in the chamber environment.
However, in rapid, dry-heat systems that use convection technology, it is the condition of the instrument—not the chamber—that eliminates pathogens. This is because metal instruments are superior absorbers of dry heat energy. In addition, air is a poor conductor, so to ensure your instruments are effectively cleaned, you must look at the internal temperature of the instrument—not the surrounding air.
What is a spore test for autoclaves?
This test uses spore strips to measure the effectiveness of sterility procedures. These short strips are made from paper and are encased in glassine envelopes that inhibit the convective effects of heat from reaching them.
When using spore strips, remember:
For accurate data, the spore strip’s location must mimic the temperature of your instruments.
If strips are not properly placed, you could get false negatives and false positives.
Strips should be placed in a manner that reflects your load conditions.
The biological monitor must be in contact with an instrument or object that has the same heat conduction properties.
Proper strip placement is equally important in steam sterilization.
Dentronix, being distributed by Diatech U.S.A., takes the guesswork out of spore strip placement and office sterilization
Dentronix has designed a special spore strip holder that is part of the FDA approved DDS 7000 accessory kit. (It’s also available separately .) This holder encases the spore strip between stainless steel pads and helps reproduce actual sterilizing conditions on your instruments’ surfaces. This device is essential to effective monitoring, particularly if you have been getting positive results from random monitor strip placement in the chamber.
Know which biological indicators are included in your spore strips for your sterilization equipment
If you are processing your spore strips in-house, be aware that many Biological Indicators (BI’s) like the ones included in our SPS SporView® kit are “dual organism.” They contain both G. stearothermophilus for steam validation and B. atrophaeus for dry heat.
The same strip can be used to validate steam, unsaturated chemical vapor, ethylene oxide and dry heat. The only difference is in the incubating temperature. Incubate dry-heat-processed strips at 37 degrees Celsius / 98.6 Fahrenheit and incubate steam strips at 56 degrees Celsius / 132.8 degrees Fahrenheit.
Incubator heater blocks for spore strip culturing are readily available at both operating temperatures from Dentronix.
At Diatech, we manufacture superior and innovative products for the dental industry… for the dentist, dental hygienist, dental assistant, orthodontist, endodontist and lab technician. We stand behind our promise of uncompromised quality and the best in competitive pricing.
Proper instrument sterilization techniques are vital to keep your patients safe. Despite your best efforts, you may find yourself facing challenges of keeping clean instruments ready at a busy dental practice. To assist you and your patients, we’ve compiled some simple ways to enable you become more efficient during the sterilization process.
Clean instruments immediately after a procedure—even if you have sterilized instruments ready.
All instruments must be cleaned before they go into an autoclave and are sterilized. However, if you don’t clean them immediately, they’re likely to get dried-on debris that will be much harder to remove later. If your practice is too busy to clean the instruments in a timely fashion, one solution is to use an enzymatic ultrasonic solution or use an enzymatic spray gel. This loosens any biological matter, making instruments easier to clean later.
However, be aware that certain liquids should not be used in chemical sterilization because they can damage your instruments. Refer to your manufacturer’s information for specific guidelines.
Increase efficiency by making sure your instrument processing area is clearly and physically divided into sections.
The Centers for Disease Control is very clear that all practices should have these processing areas clearly separated. This should include areas for:
If it’s not possible to have a physical separate space, make sure they are properly labeled and the employee processing the instruments has specific training on how to prevent cross contamination. (Centers for Disease Control.)
Periodically verify your sterilization cycles and use the sterilizer properly.
Spore tests or biologic indicators can help ensure that your sterilization cycles are functioning properly. The temperature and time should not be interrupted during the cycle. Don’t open the sterilizer door during the cycle, and don’t overload it.
Pack your tools correctly.
Don’t place too many instruments in a package. Also be sure that you’ve placed the packet either paper up, sideways or paper down depending upon the particular model you have. Also, use packaging material that’s appropriate for the method of sterilization.
Diatech offers a wide range of sterilization items
At Diatech, we manufacture superior and innovative products for the dental industry… for the dentist, dental hygienist, dental assistant, orthodontist, endodontist and lab technician. We stand behind our promise of uncompromised quality and the best in competitive pricing.
Passport® Sterilization Monitoring Service tests with postage paid envelope lets you easily mail two dual-organism strips and a control strip per test to the lab. Lab results are returned to your office quickly for both positive or negative results.